| Threat Assessment:
Estimated Number of Hostiles:
45 (Elite)
Estimated Firepower: AK's,
PKM's, Druganov's, RP 46's, Z84's, Pistols, Grenades,
Jeeps.
Disclaimer:
The great thing about these games
are there are an infinite amount of possibilities to
accomplishing the tasks. Of course some methods are
better than others and the following walk-through presents
one solution that I used that worked quite well.
This is the worst case scenario. Civilians,
Urban Setting, No friendly casualties. An operatives
worst nightmare. This was by far one of the more difficult
maps I have played. Well, initially it is. If you can
survive the first few minutes and figure out the "trick"
to this map, it is definitely survivable. If you think
all out assault on the enemy, chances are you will likely
be mowed down.
I used the following troop configuration
to have a well rounded team in an unfamiliar urban setting.
Given the objectives, I loaded out a few of the operatives
with sensors to keep an eye on the enemy. With the distinct
possibility of CQB, I brought a fair amount of M4's
given their capability and versatility. Also, a support
operative in case the enemy rushed the scene and a sniper
to alleviate any opposing snipers. Grenades have limited
use, but if employed properly, can be effective. Any
variety of troop loadout can work on this map.
Team A -
Defend the Voting Center
Rifleman – Silenced M4
SOCOM – Sensors
Demolitions - M4A1 - Grenades
Team B - Defend the Voting Center
Rifleman – Silenced M4
SOCOM – Sensors
Support - M249 - Grenades
Team C - Rescue Civilians
Rifleman – Silenced M4
SOCOM – Grenades
Sniper – SR25 Silenced – Grenades
Introduction
Your teams start in the center
of the map in the polling center. Their job, protect
it at all cost so the voters can elect a man to clean
up the streets of the thugs that are out after you.
The mission briefing is very clear that the polling
center is the designated target of the enemy, and it
was obvious a lot of hostile forces were going to be
present. So, even though it is the second objective,
I focused on it first. Then, I went to rescue the civilians
(Objective One). Last, I assaulted the Command Post,
but by the time I got there it was nothing more than
a few hostile soldiers. Piece of cake. The whole time,
you're concentrating on the X Objective - No Friendly
Casualties. I found this mission extremely difficult.
The initial setting can be quite challenging to overcome.
Using this plan, it is possible
to execute and accomplish all the mission Objectives
with no KIA's on Elite.
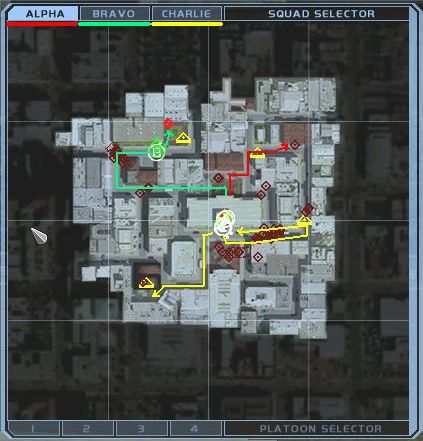
Deployment
Team
A Rifleman deployed a sensor at each entrance (north
and south) in order to keep an
eye on things, and it was quite useful. Immediately
it was evident that any assault would likely come from
the northern entrance. alpha
and Bravo
Teams took up opposing positions guarding the entrance
way. alpha on left, Bravo on the right. Recon - Firing
arcs located towards the appropriate entrance, and in
the prone position. I didn't want them to fire, unless
the enemy moved in first, and after watching the map
apparently they weren't going to...yet.
Charlie Team
was going to "slip" out the back door and
see if they could manoeuvre into a better firing position.
They went prone and began crawling out the back door.
The sensor indicated at least one hostile contact directly
south. However, the further they crawled out, the more
obvious it became there were a lot more soldiers in
the area. Straight to the east there were a number of
soldiers that the sniper quickly began engaging. Both
operatives managed to crawl behind a parked car. This
alerted the troops to the south, so Charlie
Team member lobbed some grenades over the parked car
which eliminated a few soldiers. While this fierce gun
battle ensued, the sound of a vehicle could be heard,
and the map indicated the presence of a hostile vehicle,
which later was identified as a Jeep. Another well placed
grenade eliminated the vehicle's occupants. With the
enemies to the east dispatched, Charlie
Team went to the prone position and crawled to the edge
of the sidewalk and to the west. Kneeling, they had
eyes on two more enemies and quickly eliminated them.
A lone gunmen was hiding in the building structure,
just east of the jeep's location. A well placed grenade
took care of this enemy soldier.
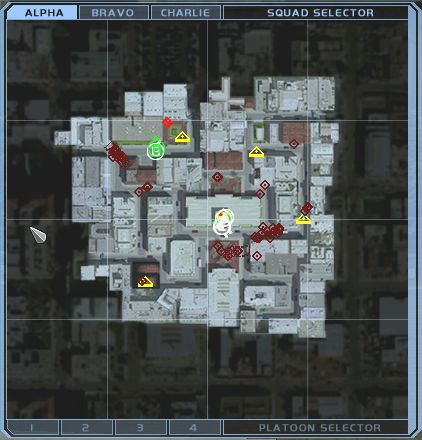
Things were still quiet for alpha
and Bravo Team, but the sounds
of a high caliber weapon could be heard. Charlie
Team moved down the main road to the east, carefully
manoeuvring behind the parked cars. At this point, looking
to the north, they found the source of the rifle shots.
A sniper in the second story of one of the buildings
was taking shots at the northern entrance of the polling
center. He was dispatched by Charlie
Team sniper. This alarmed another enemy soldier that
came around the northeastern corner of the polling center,
and the sniper eliminated him as well. At this point,
the southside of the polling center was relatively clear
of all enemy forces. Charlie
Team decided to rescue the civilian just to the east
of their current position. A single civilian was being
held hostage by two enemy soldiers. One was covering
the hostage, the other was watching the area. The sniper
eliminated both, the one covering the hostage first.
At this point, Charlie Team
came under heavy attack by some hostile forces that
transitioned from the front of the polling center down
the main road to the south. Both Charlie
Team members went prone and were able to eliminate the
assault of enemy soldiers, many of the shots fired under
the vehicles. A well placed grenade helped out too.
Charlie Team waited a few minutes
to ensure the area was clear and then moved out to rescue
the civilians to the west. After a short sprint to the
objective, it was just a matter of quickly shooting
the enemy soldiers holding the hostage. At this point,
with hostages in tow, Charlie
Team returned to the polling Center through the southern
entrance.
The sensor revealed that the northern
area was now relatively clear since most of the enemy
soldiers headed south down the road east of the polling
center. alpha Team Rifleman
peered around the door and dispatched one enemy soldier.
Bravo manoeuvred out the door
and to the left behind the pillar of the building. From
this point they could see two enemies to the west, and
eliminated them. Charlie Team
maintained guard on the polling center and the rescued
hostages. Bravo Team proceeded
west to assault the Command Post and alpha
Team proceeded to the northeast to rescue the remaining
hostage.
As alpha Team
proceeded, no further enemies were encountered. The
hostage was found on the balcony where the sniper had
been perched before Charlie
Team finished him off. alpha
Team proceeded back to the Polling Center with one hostage.
At this point, Objective One was complete.
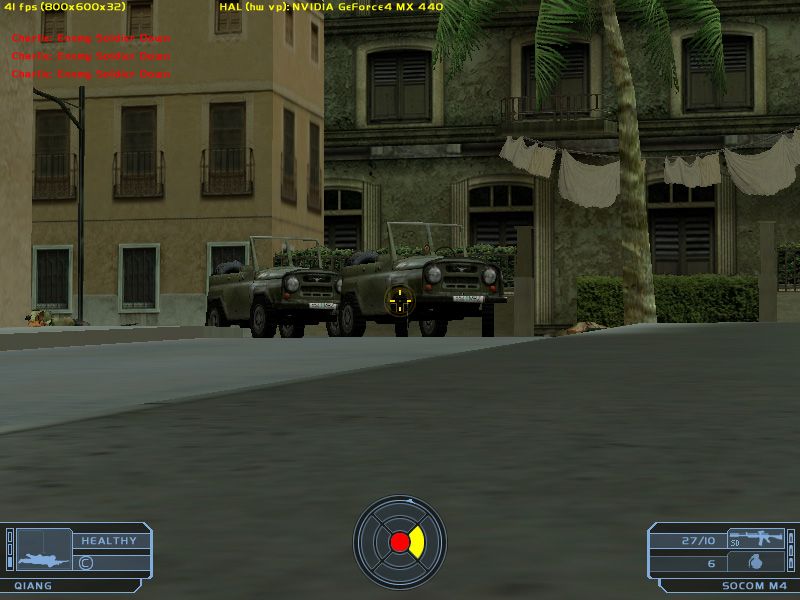
As Bravo
headed west and rounded the street corner to proceed
north, an enemy Jeep approached. Bravo
Team immediately hit the pavement and began firing on
the Jeep. A number of enemy soldiers were escorting
the Jeep and they returned fire. As the gun battle blazed
on, another Jeep with more soldiers arrived. Bravo
Team continued firing on the enemy forces and eliminated
them all. This was an intense gun battle. Take
out the Jeeps as quickly as possible!
Gathering up their weapons and reloading,
Bravo Team proceeded to the
Command Post, or the remnants of. A walk through the
alley, around a couple of corners, and two remaining
soldiers were all that was left. Once they were dispatched,
Mission Complete. All Objectives satisfied.
Tips and Strategies:
- This map was the only map where
I had the opportunity to get two
kills with one shot by my sniper, twice. See
if you can find them.
- This map can be tricky and difficult
if you're not careful. Don't try and go out of the
polling center via the northern route.
- If you take a team (with silenced
weapons) and run out the southern exit of the polling
station, they can get in position before the enemies
arrive and take them out easily when they do show
up.
- Anytime hostages are involved,
it's important to eliminate the enemy quickly or they
will likely execute the hostage. In this case, that's
mission failure. Also, be careful with the grenades
around the civilians.
- Be cautious of the Jeeps. You may
encounter them in various different places.
- Lots of opportunities for cover
- cars, buildings, pillars, columns. Use it.
|
