| Threat Assessment:
Estimated Number of Hostiles:
50
Estimated Firepower:
AK's, Russian 7.62 DP's, RP 46's, Z-84's.
Disclaimer
The great thing about these games
is there are an infinite amount of possibilities to
accomplishing the tasks. Of course some methods are
better than others and the following walk-through presents
one solution that I used that worked quite well.
First, I used the Troop Configuration
listed above because of the versatility and suitability
in the wide open areas with the assault by a large number
of troops. I found it necessary to have multiple snipers
on this level and also the need to protect the snipers
with some firepower given the fact that many of the
hostile troops will storm the beach that your troops
originally occupy. Also, the first objective needs to
be fulfilled within a certain amount of time or the
vehicles will leave and the objective will be a failure.
Introduction
Approximate number of soldiers encountered
in this area: 5-10
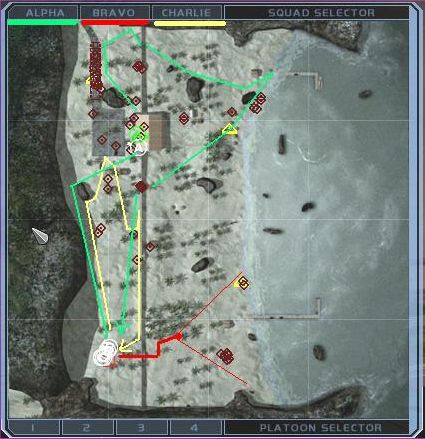
After a smooth and quiet helo
insert, the teams started in the southwest quadrant
of the map. With time being an issue, alpha
and Charlie
Teams immediately began heading towards the north following
the western mountain ridge. Bravo
Team headed to the east, went down the beachfront stairs
and went into a hold/prone position with a recon "firing
mode" and an arc of coverage to the east. Bravo
Team easily had eye contact with Objective 3 and a number
of enemy soldiers, but held their recon position fearing
an assault this early would alert the vehicle column
to move out. Once alpha
and Charlie
neared the center of the beach, they engaged roughly
4 enemy soldiers. Then alpha
and Charlie
Snipers were able to drop a few more enemy soldiers
near the beach house. With the area clear, both teams
moved to the large rock near the western mountain ridge
for cover. Again, the snipers were provided the opportunity
to dispatch a few more enemy soldiers.
Objective One - Disable Vehicle
Column
Approximate number of soldiers encountered
in this area: 10-15
From behind the boulder, alpha
and Charlie
Team surveyed the vehicle column and the beach house.
An occasional enemy soldier would investigate the area,
however the snipers would quickly eliminate them. After
a few minutes and after evaluating the area clear, alpha
Team moved to the beach house and Charlie
Team positioned on the west side of the small buildings.
Charlie
Team went to a prone position with an assault firing
arc covering the northern region including the vehicle
column and managed to dispatch a few enemy soldiers.
alpha
Team cleared the Beach House of its two occupants using
grenades and then proceeded to the vehicle column. After
a fierce battle with some of the enemy soldiers that
exited their vehicles, the "Vehicle Column"
was stopped in their tracks and the first objective
was complete.
Objective Two - Clear Beach
Approximate number of soldiers encountered
in this area: 10-15
With the first objective out
of the way, the beach was crawling with enemy soldiers
and an assault would result in certain death. With the
enemy quickly approaching, alpha
Team first attempted to proceed to the down the stairs
on the northern side of the map, but with all the activity,
retreated back to a position facing south covering the
stairs and beach house, while Charlie
Team took up a position covering the central set of
stairs and beach house, facing north. A large amount
of enemy soldiers rushed the stairs and beach house
but were easily eliminated by alpha
and Charlie
Teams. The two teams chose to wait until clearly no
more enemies were approaching. Only then did alpha
Team manoeuvre down the stairs and onto the lower area
of the beach. Bravo
Team was still covering the AGS and soldiers to the
south, and Charlie
Team maintained their position covering the stairs and
beach house. alpha
Team mopped up a couple of stragglers and then proceeded
to the northern jetty. A brief gun battle with approximately
five enemy soldiers occurred. Once eliminated, Objective
Two was accomplished and then alpha
Team was able to partially complete Objective Four by
seizing the material on the northern jetty.
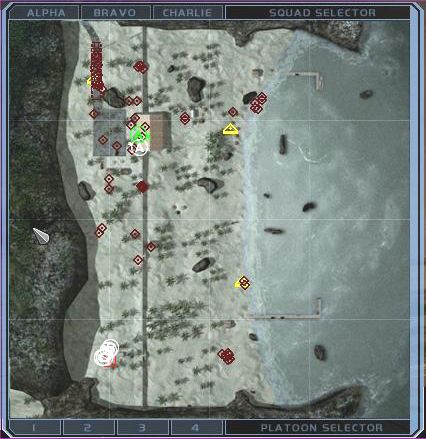
Objective Three - Seize Control
of AGS
Approximate number of soldiers encountered
in this area: 3-5
With a majority of enemy soldiers
eliminated, Bravo
Team took aim on the AGS operator and his side kick
and quickly eliminated them. Not hesitating for a second,
Bravo
Team opened up on the soldiers who appeared to be in
formation, making it extremely easy to dispatch them.
Another enemy soldier to the north alerted to the gunfire
begin advancing on Bravo
Team only to be eliminated by one of Bravo
Team. At this point, all enemies were eliminated, satisfying
the requirements of Objectives Three and Four. The mission
concluded with no injuries or KIA's.
Objective Four - Seize Material
on Jetties
Approximate number of soldiers encountered
in this area: 5-10
With alpha
Team already securing the northern jetty and Bravo
Team eliminating the final enemy soldier, this objective
was automatically completed. The jetties are clearly
visible on the map, should follow on teams need to fulfills
this requirement.
Tips and Strategies
This map is very deceptive. At
first it appears easy, and it's difficult. Then it appears
difficult and it's easy. Remember that.
- Snipers
can neutralize the threat before it gets to you, but
when the enemy rushes you, snipers can't shoot quick
enough. Consider using Snipers with other classes
to complement each other.
- Bring grenades
or weapons equipped with a grenade launcher. OICW
works quite well on this map.
- The beach front stairs make good
choke points. Cover those areas when the enemy is
assaulting and it becomes rather easy to eliminate
them.
- Don't wait to
long to take out the vehicle column or it will
be a mission failure.
- If you take out the AGS too soon,
the enemy will attack you in force and you may find
yourself in a disadvantageous position.
- Stay low. Go
slow.
|