| Threat Assessment:
Estimated Number of Hostiles:
48
Firepower:
Z84's, AK's, Russian 7.62 DP's, SVD's and grenades.
Disclaimer:
The great thing about these games
is there are an infinite amount of possibilities to
accomplishing the tasks. Of course some methods are
better than others and the following walk-through presents
one solution that I used that worked quite well.
First, I used the Troop Configuration
listed above because of the versatility and suitability
in the jungle environment. Given the layout of the map
and the objectives, it was quite possible to execute
the mission effectively and efficiently using the following
technique.
Introduction:
Approximate number of soldiers encountered
in this area: 5-10
After a helo insert in the middle of a hot LZ, the team
started at the northeastern part of the map. An unsuspecting
hostile soldier will quickly be eliminated, possibly
alerting other enemies located to the west of their
presence. The ghosts need to get down and low quickly.
I positioned Charlie Team
to the west in a hold/prone position with suppress arc
of fire directly to the west to cover the hill. While
positioned there, the two snipers eliminated a number
of hostile soldiers as they came over the hill. Bravo
Team manoeuvred to the south a short distance and went
into a hold/prone position with a suppress arc of fire
directly to the south. Alpha
Team manoeuvred to the
north and carefully approached the hill. Once the troops
were in this position it was time to begin focusing
on the mission objectives.
Objective One - Seize Plantation
Grounds
Approximate number of soldiers encountered
in this area: 10-15
Once Alpha
Team reached the hill,
and just before the ghosts went over the crest, Alpha
team went to a prone position. Crawling to the top of
the hill gave a pretty good view of the compound area
below and the outskirts of the first objective. One
of the structures appears to be a house with a tree
that has been knocked over and leaning against it. The
door was open, and realizing the risk, Alpha
Team - Rifleman using
M203 fired one grenade into the house, dispatching the
two occupants. Three hostile soldiers from the south
alerted to the commotion began approaching. These three
soldiers were quickly dispatched by Alpha Team.
Once the area was relatively clear,
Charlie Team proceeded up the
hill and continued due west from their starting position.
Three hostile soldiers were sighted and dispatched in
quick succession. Bravo Team
moved slowly and silently to the south, and eliminated
one hostile soldier. Sensing the possibility of a well
equipped and entrenched enemy, Bravo
Team went prone with a suppress fire arc covering
the southwest, and held their position.
Alpha Team
proceeded west to the structure located in the northwestern
region of the fenced yard. This structure appeared to
be a barn or stables, and was open. Peering around the
corner, Alpha Team member eliminated
one enemy soldier. Three others emerged from the stalls
and they too were quickly dispatched. With all the hostile
soldiers eliminated from the Plantation Grounds, Objective
One was completed. At this time, Bravo
Team was still holding in their previous position.
Alpha Team and Charlie
Team were positioned in the Plantation Area and
began proceeding to the Second Objective.
Objective Two - Secure First
Package
Approximate number of soldiers encountered
in this area: 8-10
There are what appears
to be two grain silos just north of the lake. Charlie
Team took up position
behind one of the silos in the prone/recon position.
A patrol of 5 hostile soldiers was headed west, just
south of the pond. Alpha Team
took up a prone/assault position to the north of the
building that houses the First Package with an arc of
fire directed at the doorway of this building. When
Charlie Team
had a clear shot at all 5 hostiles, they were given
the assault command. They easily dispatched the 5 soldiers,
but did draw some return fire. Alpha
Team eliminated two hostile
soldiers that emerged from the doorway to investigate
the commotion. Charlie Team
held their position and Alpha Team progressed towards
the building and subsequently eliminated the two remaining
soldiers inside. With the area clear, Charlie
Team manoeuvred into the
building and Alpha Team
accomplished Objective Two by securing the first package,
the crate that appeared to have a tarp draped over it.
Objective Three - Secure
Second Package
Approximate number of soldiers encountered
in this area: 12-14
With the pressure on
and the end of the mission near, the hostile soldiers
knew they were in trouble. Bravo
Team started drawing fire
from two soldiers to the south, so they manoeuvred due
west to the large boulder and then proceeded crawling
to the southeast until they could see the two attackers.
The enemy soldiers were finally neutralized after a
fierce gun battle. Bravo Team
proceeded to the southeast and took up position next
to the run down shack. This point was atop a hill and
provided an excellent position to engage the enemy below.
Alpha Team
doubled back around the pond to the west until they
hit the road. Then they proceeded south. When they neared
the turn to the east, two hostile soldiers came running
up the hill towards them. One lobbed a grenade and the
other engaged with machine gun fire. Alpha Team narrowly
escaped the grenade blast and managed to take out the
two soldiers. They proceeded to the edge of the road
and detected movement in the shack below.
Charlie Team,
after getting the all clear from Alpha Team, departed
the hangar where the first package was secured, crossed
the road and engaged the enemy forces that Alpha Team
had detected. Alpha Team engaged
a few of the soldiers that attempted to run. Due to
the position and firepower, the enemy was unable to
return fire.
Alpha and Charlie slowly moved to the
east to secure the final objective.
With Bravo Team
towards the north covering the south, Charlie moved
in from the west and Alpha Team
moved in position to secure the final objective. At
this point, the enemy was surrounded and offered little
resistance. All hostile forces eliminated and Objective
Three was accomplished.
X - No Team Casualties
This goes without saying. A mission
(especially the first) is a failure if you don't bring
all your boys home. Wounded is one thing, but don't
settle for the loss of a single man.
Tips and Strategies
- This walk-through was played on
elite. If you play either
of the other two difficulty levels, you can expect
less enemy encounters.
- There are a few snipers
strategically placed on the map. Use your binoculars
to scan any area you are about to travel to, and stay
low. The snipers won't miss if they
get a shot.
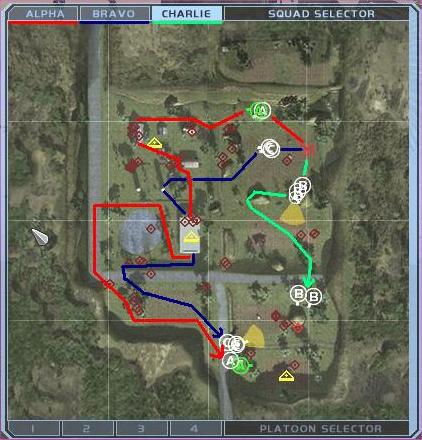
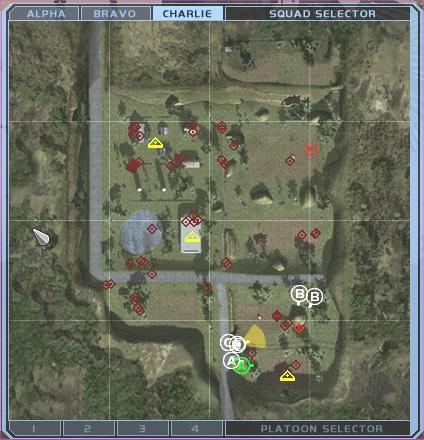
- Look at the Enemy Placement image
to obtain an estimate of where you can expect to encounter
bad guys. The exact position, movement and encounter
with the enemy forces depends on many variables, so
it may vary slightly. Don't panic, Improvise.
- Move cautiously.
Don't stand up unless you are certain an area is clear.
At a minimum, kneel when traversing to different areas.
When in a holding pattern, go to the prone position.
- Use the environment,
the enemy does. Given the vegetation and the terrain,
there are a few areas where you can have a height
advantage/disadvantage. Select your position carefully.
Many of the enemy are well hidden and waiting to get
a bead on you - look just to the left of the reticule
in this
image.
- If you're new to Ghost Recon, and
you're getting discouraged...use the quicksave
and quickload. If you're a pro...try it with no saves,
no threat indicator and complete ALL the objectives.
|