| Threat Assessment:
Estimated Number of Hostiles:
55
Estimated Firepower: AK's,
PKM's, Druganov's, RP 46's, Z84's, Pistols, Grenades,
Machine Gun Nests, Tank. Basically, expect anything.
Disclaimer:
The great thing about these games
are there are an infinite amount of possibilities to
accomplishing the tasks. Of course some methods are
better than others and the following walk-through presents
one solution that I used that worked quite well.
Here it is. The
final level. You might expect the final level
to offer a certain degree of difficulty, and it does.
But it’s also one of the easier levels to accomplish.
It requires patience and careful observation. The adverse
weather conditions need to be respected because it will
either help or harm you. With only one mission objective,
you wont be subjected to the pressures of completing
various tasks, though there is some business that needs
to be taken care of. Priego is entrenched in a run down
but heavily fortified building. The area is protected
at each “corner” by a guard tower. There
are numerous patrolling guards. Intel warns of a helicopter
that may be used for an escape, so it’s important
to deal with it. I chose to destroy it, which provided
quite the explosion. Intel fails to mention the presence
of a Russian Tank in the compound, so pack accordingly
(they do warn you to take an M136).
I used the following troop configuration
because I felt it was necessary to carry snipers to
engage the enemy from long range but also important
to carry some heavy firepower to deal with the entrenched
troops and the enemy armor. Grenades or grenade launching
weapons also offer some advantages. I also thought it
was important to have a recon team equipped with some
silenced weapons to survey the area without alerting
other enemy forces when they needed to dispatch any
enemy forces they encountered.
A – Recon Team
Rifleman – Silenced M4
SOCOM – Grenades
Rifleman – Silenced M4 SOCOM – Sensors
B – Assault Team
Demo – M4A1 – M136
Rifleman – OICW – OICW Grenade Launcher
C – Sniper Team
Sniper – SR25 Silenced
– Grenades
Sniper – SR25 Silenced – Grenades
Introduction:
After a quick helo insert in
the mountainous region, the troops were faced with one
mission objective, but two goals. The first goal was
to sweep and clear the external area. The area surrounding
Priego’s compound needs to be rid of any hostiles
to prevent getting attacked from behind when the Compound
is assaulted. Also, the helicopter needs to be destroyed
to prevent Priego’s escape. After the external
goal is complete the teams will proceed with focusing
on the internal goal of the compound and ultimately,
the mission objective.
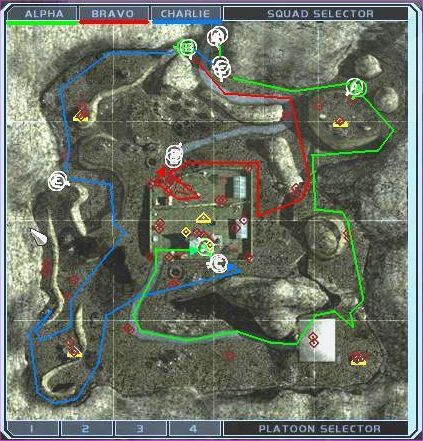
alpha Team
(Recon) hit the dirt running and proceeded to the south
/ southeast hugging the side of the mountain until they
were headed almost due east. Through the fog and rain,
the silhouette of a machine gun nest could be seen.
Using a single shot, this enemy soldier was quickly
dispatched. Just to the south of their position where
the paved road makes a hair pin turn, two enemy soldiers
were caught off guard and were taken out by alpha Team.
With the area clear, alpha Team proceed up the hill to
the east where one of the guard towers was located.
Going prone, and crawling into an optimal firing position,
the soldiers around the guard tower were quickly eliminated,
resulting in the first guard tower being cleared. alpha
Team proceeded southeast down the hill and back to the
west a short distance to check the area clear.
Charlie Team
(Sniper) headed due west from the start, and kept their
backs along the wall of the mountain. They only had
to go a short distance before the guard tower could
be seen off in the distance. The snipers easily picked
off the unsuspecting soldiers from a safe distance.
Heading south, they encountered another lone enemy soldier
and eliminated him too.
Bravo Team
(Support) held their position awaiting alpha and Charlie
Teams to complete the sweep of the area.
alpha
Team continued south stealthily and found two patrolling
soldiers heading away from them. alpha Team was able
to get to a relatively close distance and dispose of
them. Afterwards, they continued south to the narrow
passage between the rocks, exposing the helipad and
a guard tower. One member of alpha Team crawled up under
a large rock that afforded some protection. The other
soldier had a clear shot at one of the enemies standing
near the helipad. After taking the shot, alpha Team focused
on eliminating the soldiers around the guard tower.
A fierce gun battle ensued, but with the superior skill
and positional advantage, alpha Team managed to defeat
the enemy soldiers. While checking the area clear, another
enemy soldier was located on the helipad, and was eliminated.
With the area finally clear, alpha Team used a grenade
to destroy
the helicopter, preventing Priego the opportunity
to use it to escape. With the helicopter destroyed,
alpha Team proceeded west, encountered another couple
of wandering guards, and easily eliminated them.
Bravo Team
followed the paved area around and then continued south.
As they reached the end of the large rock outcropping,
they encountered a couple of troops and eliminated them.
They proceeded to the eastern wall of the fort and held
their position, watching north and south.
Charlie Team
headed east a short distance until the western side
of the fort was visible. Going prone and crawling to
the top of the hill, a lone soldier manning the machine
gun nest was eliminated. Noticing movement to the southwest,
two more soldiers were observed and easily eliminated.
Crawling further towards the fort, two soldiers were
spotted in a crater just south of the fort, and subsequently
dealt with by the sniper team. Charlie Team proceeded
towards the southwestern guard tower and engaged and
eliminated the enemy from a safe distance. They proceeded
north along the western mountain ridge, and found two
guards headed away from them. They were easily eliminated.
With the external area clear, Charlie
Team proceed to the south wall of the fort. They eliminated
the hostile forces in the lower right corner of the
fort, and then took up a prone position covering the
southern entrance of the fort.
At this point, Bravo
was positioned on the eastern wall, Charlie
was positioned on the southern wall and alpha
Team positioned themselves on the lower left corner
of the fort. The external goal was completed and now
was time to focus on the internal goal, and final objective.
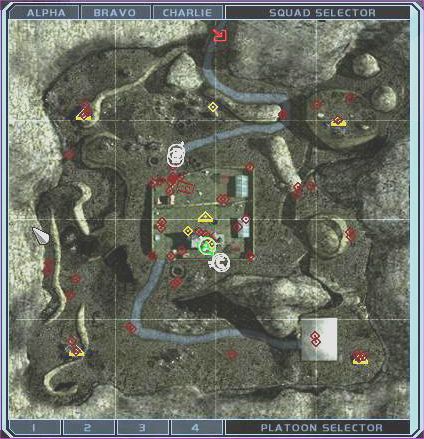
This is where things get challenging.
Objective One - Capture and
Secure Priego
The fort is run down and in shambles,
but heavily fortified. The fort is laid out so the upper
third of it has a wall that runs almost the entire length.
Just short of the eastern side, there is a gap that
allows access to the southern portion of the fort. Going
in this way is very dangerous, and not recommended.
All the machine gun nests and snipers located on the
corners of the forts are easily eliminated, and once
this has been done, it was time for the teams to mount
their assault on the fort.
Bravo Team
mounted their attack first. Rounding the northern eastern
corner of the fort, Bravo Team hugged the wall and approached
the northern entrance. A lone guard was out front amongst
the rubble and was taken down quickly. Bravo Team Member
with OICW fired some grenades at the entrance which
eliminated a few guards. A few brave enemy soldiers
emerged from the fort and were easily mowed down by
Bravo Team. When the area appeared cleared, Bravo Team
Demo Soldier retrieved his M136 and positioned himself
on the northwestern corner of the fort. He was able
to position himself to get a clear and protected shot
off at the tank, which he did. Enemy Armor destroyed.
With the tank destroyed, Bravo Team Rifleman using OICW
cleared some potential enemy hiding places. (Use extreme
caution, as some of the buildings are rigged to blow
up.) Bravo Team then went prone along the dividing wall
and under the cover of some of the steel beams and debris.
As enemies came through the gap in the wall, Bravo Team,
while maintaining good cover, had clear shots at eliminating
them.
While the enemy was distracted, alpha
Team moved in. First they cleared the area by throwing
in some grenades which took down some unsuspecting enemies.
Once in the confines of the fort, they moved to the
western wall of the building located in the center (just
south of being center) of the fort. Peering around the
north (front) of the building, some soldiers were spotted.
A well placed grenade took care of some. Others came
out to try and assault alpha Team. Once again, alpha Team
encountered a fierce gun battle, but was able to eliminate
the soldiers. Sensing the danger of the front, alpha
Team regrouped and proceeded east along the rear of
the main headquarters. They cleared this area and then
moved to the barracks near the eastern wall, and cleared
it of its two occupants.
At this point, Bravo
hadn't encountered any more attacks, and positioned
themselves to the north of the fort to cover in case
any reinforcements from outside approached or to eliminate
any chance of Priego escaping this way. Charlie
Team covered the southern exit of the fort and maintained
their position.
alpha Team
knew the general location of Priego was in the central
building, and returned to the southern wall of this
building, which had a door. The door was opened revealing
a hallway. A couple of grenades were thrown in to ensure
the area was clear. The area was checked clear, and
the house was inspected. There was one room that hadn't
been inspected. alpha Team took position to open the
door, but to be clear from any return fire. The door
was opened, and an enemy soldier was spotted covering
the door.
He was quickly eliminated. alpha Team
Rifleman leaned around the corner and could barely discern
two figures, one kneeling and one standing. Standing
himself, alpha Team Rifleman leaned and fired a single
shot killing the soldier. The kneeling man was Priego,
and realizing his defeat, dropped his gun and raised
his hands. Mission
Accomplished. Lets go home fellas.
Tips and Strategies:
- As in all other levels. Move
slow, keep your head down and scan the area
you are about to occupy. When leaving a team in a
stationary position, make them go prone, with their
backs protected and give them an area to cover.
- The most difficult
part of this mission is the assault on the
compound. This is where heavy weapons and grenades
can come into play. Work smarter, not harder. You
don't have to go in Rambo style when you can just
as easily clear an area with some grenades.
- Whenever you engage an enemy,
maintain your position at least for a few moments
to ensure there are no reinforcements are coming.
- If you're a novice, use the Threat
Indicator and Quicksave. If you're wanting more of
a challenge, don't. For an even bigger challenge,
bring all your boys home alive.
- The outer areas almost seemed
to easy, especially for the final mission. Don't be
lulled into a false sense of security. The compound
is the challenge, and it can be quite difficult. Don't
linger in an area to long or you might find
yourself taking heavy fire.
- The weather
can really hamper your sight. Move forward in small
paces and then rescan the area. It's amazing that
one place you can't see anything and one step further
you can.
- You would expect a guard tower
to have snipers and heavy machine guns. They do.
|