| Introduction
Let me preface this with some administrative
notes. This is not your typical walk-through. As an
old saying goes, "There's more than one way to
skin a cat." Rather than present to you a traditional
walk-through with my idea of how this mission should
be completed, I have set this up as an intelligence
briefing on what you can expect. First, there is basic
mission information from your briefing. Next, I break
down what you can expect from the opposition forces
with regard to strength, equipment, locations and patrol
routes. Following that, you will see what kinds of reactions
to expect from the enemy. Finally, I will give some
tips on potential strategies and tell you what worked
for me on this mission. The finally decision about how
to tackle this one is entirely up to you. Please note
that the whole point of this is to give you 'spoilers'
about the mission in order to help you complete it.
Please stop reading now if you do not want any surprises
ruined.
Briefing
Buckle up, people. You're going to
Isla de la Juventud, a hundred miles south of the main
island. Batista used it for political prisoners, but
Castro turned it into a tourist trap. The beaches are
nice, but half the island's still swamp, and guess which
part you're going to be seeing.
The FDG's got an airfield right in the middle of one
of those swamps, on the western side of the island.
They've been using it for weapons transfers - the plane
that dropped off those packages you recovered on the
tobacco plantation flew out of there - and to dabble
in the drug trade. By shutting it down, we shut down
one of their primary supply pipelines.
You'll be inserting by boat on this one, so be prepared.
Your two main objectives are the airfield itself and
the ammunition storage dump nearby. Seize one and then
plant demolition charges to destroy the other. After
that, get out as quickly as you can. With the way things
are going on the main island, we don't expect that the
airfield is heavily defended, but that's no guarantee.
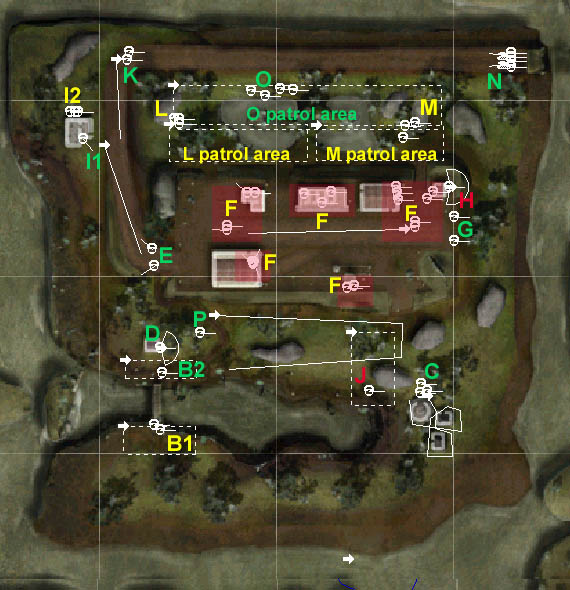
Opposition Forces
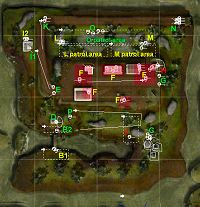 |
Key:
Green = present
on all difficulty levels
Red = present
on elite only
Yellow = strength
of team varies by difficulty level
Click for full image.
|
B1 =
One man on all difficulty levels. Second man added on
elite. Armed with vz58s. Patrol(s) indicated zone south
of footbridge.
B2 = One man patrol in
indicated zone, north of footbridge. Armed with rp46.
C = A three-man patrol
that walks around cluster of three small buildings.
Armed with vz58s.
D = Guards approach to
small building. Cover arc shown on map. Armed with z84.
E = Two man stationary
team at southwest airfield gate. Both personnel are
armed with vz58s.
F = Main airfield defense/patrol
force. Number present ranges from eight to nineteen,
depending on difficulty level. Some stationed in fixed
locations on airfield and inside buildings. Others patrol
airstrip. Weapons include vz58s, rp46s, and degtyarevs.
G = Two-man stationary
team located at east airfield gate and armed with vz58s.
H = Lone sniper located
at northeast corner of airfield. Armed with Dragunov.
Firing arc indicated.
I1 = Lone guard patrolling
road between Ammo Dump and southwest airfield gate.
Armed with vz58.
I2 = Two to three man on
guard at Ammo Dump. All are armed with vz58s.
J = One to three man patrol
in indicated zone. Armed with vz58(s).
K = Two man patrol, armed
with vz58s. Responsible for northwest section of outer
road.
L = Up to four men armed
with a mix of weaponry. Patrol designated area.
M = Up to four men armed
with a mix of weaponry. Patrol designated area.
N = Four personnel in two
jeeps, all armed with vz58s.
O = Four man patrol, armed
with a mix of weaponry. Patrol designated area.
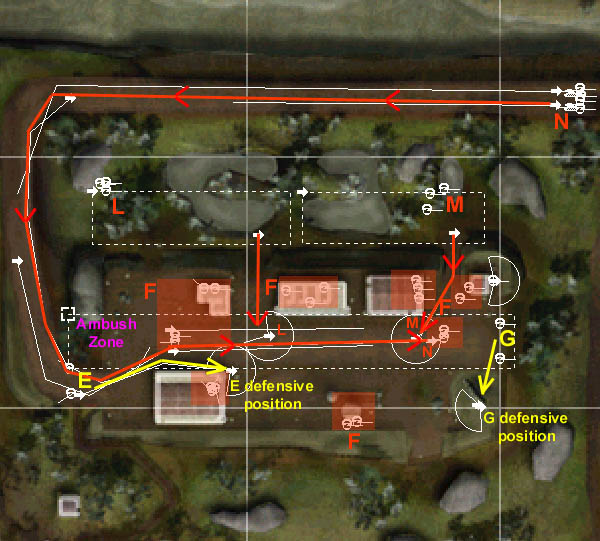
Trigger Plans
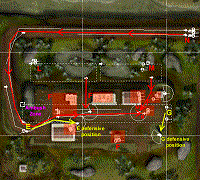 |
Alerts
- These trigger plans go into effect when the
enemy has been alerted to the presence of your
team in some way. This does not always have to
be the result of being spotted. Too much noise
can cause an alert trigger plan to be activated.
Click for full image. |
E = If
the guards at the southwest airfield gate are alerted
to the presence of your team, they will immediately
run to the northeast corner of the hangar and take up
defensive positions in order to protect the aircraft/airfield.
G = If the two men guarding
the east airfield gate are alerted, they will immediately
run to the wrecked helicopter in the southeast corner
of the airfield and take up defensive positions.
Ambush!
- If any member of your team enters the ambush zone
delineated on the map, then the proverbial waste matter
will impact the air circulation device. This single
act will send ripples through the opposition forces
arrayed about the airfield and outlying areas. Needless
to say, this could be hazardous to the health of your
team. The mission can be completed
without triggering the ambush - however, 1) you have
to be pretty careful and 2) while an interesting exercise,
it takes something away from the overall experience
of this mission. If you have already experienced this
ambush and are having trouble progressing beyond this
map, then I recommend trying to avoid engaging it by
not entering the ambush trigger zone.
F = Once
the ambush is triggered, the airfield defense force
will issue forth from the buildings and do their utmost
to help you and your team give your lives for your country.
They will take up various defensive positions and/or
initiate patrols of the airfield (as depicted on the
map) until they locate you and will then engage with
maximum violence.
L & M = These two patrols
will immediately run for the gates adjacent to their
respective patrol areas and enter the airfield grounds
to take up defensive positions, as indicated.
N = The two jeeps will
immediately race down the road to the gate in the southwest
corner of the airfield perimeter fence. Upon entering
the airfield, they will travel down the runway to the
east end and the soldiers will disembark and prepare
to engage your forces.
Courses of Action
As in all Ghost Recon missions, the
tactics and plans employed by your team are entirely
up to you. There are as many different ways to perform
this mission as there are players. One common factor
-- no matter which approach you take, you will need
at least one demolitions specialist equipped with demo
charges in order to complete the mission.
The more-or-less 'traditional' approach
to this mission would involve a team with a mixture
of weapons/specialties conducting a coordinated assault
on the enemy. One element could advance from the beach
across the footbridge while another advance by the huts
to the east. Advancing onto the airfield itself will
trigger the ambush and all heck will break loose. This
can be frustrating for some players, but others may
find it an interesting challenge to deal with, particularly
on the harder difficulty levels. Most of the approaches
to this mission are variations on this one, using different
tactics and avenues of approach for your teams. Often,
the best way to use this approach is to maximize violence
on the objective by having all of your forces converge
on the target simultaneously with as much firepower
as you can muster.
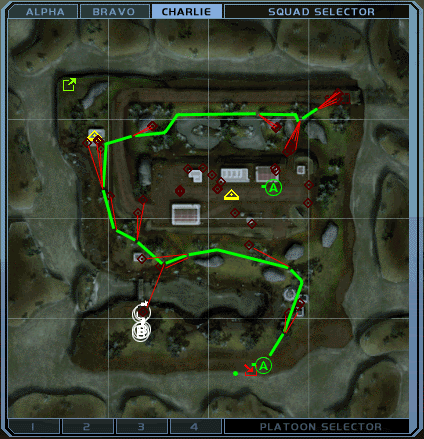
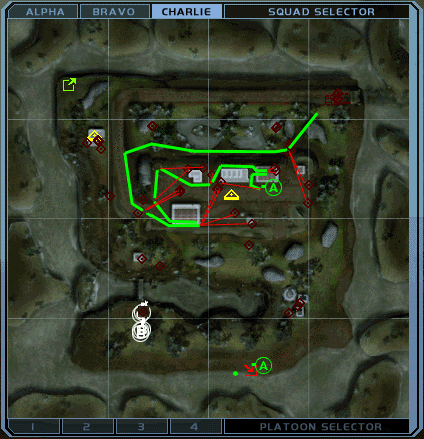
The way that I completed this mission
was also something of a challenge. Using three teams,
I stacked Bravo team with two demolitions men and loaded
Charlie team with two riflemen and a support gunner.
Alpha team consisted of one specialist armed with a
suppressed M4 carbine. I used Ramirez, my Alpha team
member, to slowly stalk the enemy and eliminate all
resistance. I completed the mission in 37:27 with 41
kills for Ramirez on Veteran difficulty by slowly crawling
around the map, so as not to alert the enemy, and quietly
eliminating them with single shots whenever possible.
The route I used is depicted in the two screen shots
below. The key was to eliminate all
opposition forces outside the airfield before entering
the ambush zone. If you can do that, then the forces
that the enemy can bring to bear on you will be significantly
less than he could otherwise. By the time I triggered
the ambush, there were less than half a dozen enemy
troops left and almost all were located inside the airfield's
buildings. When using this approach, remember to walk,
not run, and crawl when necessary. This will help keep
the enemy from being alerted to your presence. You can
also use a lone sniper for this approach, but I prefer
the M4 because I can lay down suppressive fire with
it when necessary in bursts.
 |
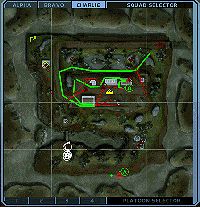 |
Click
for full image |
|