| Introduction - Part 3
- Palm Trees
One
of the more challenging trees for me is the palm tree.
It may take a few trys
to
get it just the way you want. You just have to be patient
and keep working at it.
In GR there's mainly
2 different palms, the tall ones and the short stubby ones.
I think those short
ones are called Angel palms. Once you create a palm leaf you
can use it for either
type of tree.
For this tutorial
I use the following textures from Island Thunder.
c01_coconut.rsb
c01_palmtree.rsb
Create a Reference
Assuming you have
3dsm up and running, load the c01_palmtree.rsb and
c01_coconut.rsb into
the material editor.
In the shader basic
parameters rollout for the Palm tree texture, place a check in
the box for 2 sided.
Create a plane in
the top view to use as a reference like we did in the fir tutorial. In
3dsm 4, press f3 to see the surface of the plane instead of the wire
frame view.
Give the newly created
plane a name. I used the name "reference" on mine.
For the size of the
reference plane, 1m x 1m should be fine.
Apply your palm tree
texture to the plane. Save.
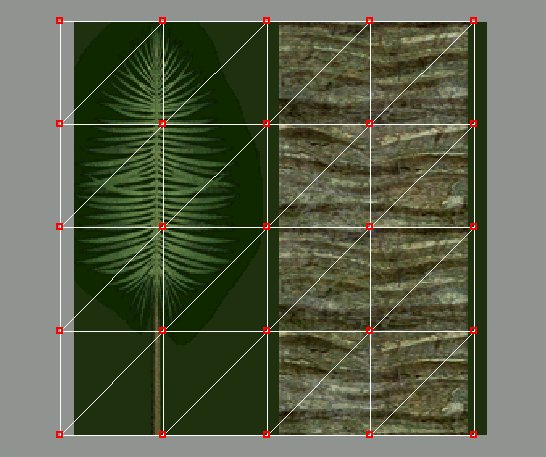
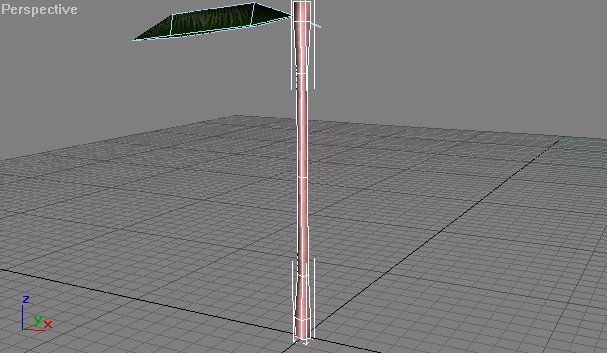
Does your reference look like this?

For
me this is a small problem because I want to outline the
palm leaf with a spline
but
have very little room on the left side. To fix this I'll
apply an Unwrap UVW and
then select all the
uvws and shift the whole box to the left which will shift my texture
to the right giving
me a little more room to work.
And
now we have a little
more room to work with.

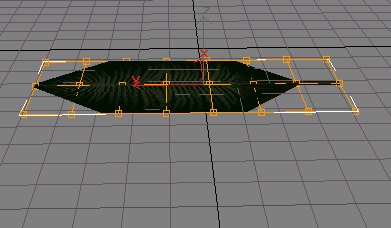
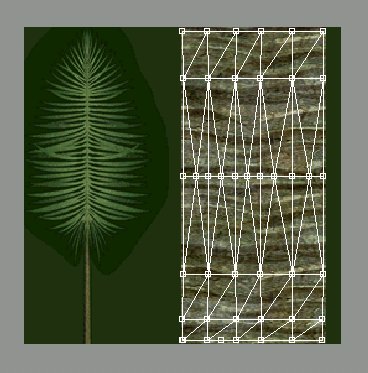
Vertices
This
next part is very important. We're going to use a
spline to outline
our palm leaf and the
number of vertices you create will determine the number
of faces. It's very
easy to create too many faces and you could easily wind up
with a palm tree that
has thousands of polys. We don't want that. It will bog
down the game. We want
to place our vertices strategically so that we have
just enough to give
us the bends we need and at the places we need them.
Here's an example
of how it should look.
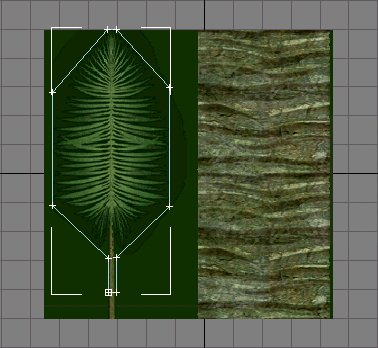
Try
to position your
verts just like this. This will allow
us to make the bends
we need. Give your spline a name
like palm
leaf for example.
Save.
Editable
Mesh
With the
palm leaf spline selected, convert to editable
mesh.
It's good to have edged
faces turned on during this next part.
You can do that by right
clicking over the area of the viewport
that says "top" and
selecting edged faces from the drop down menu.
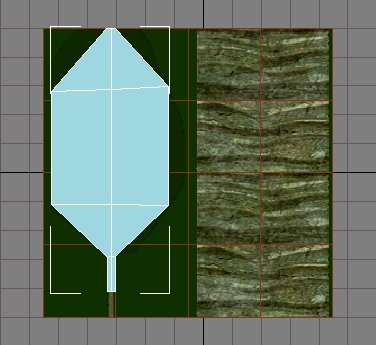
We now have to create
edges wherever we want our leaf to bend.
The first thing we need
to do is cut a line right down the center
going lengthwise.
Do this by going into
poly sub-object mode and clicking "cut" under
the edit geometry rollout
and then click your leaf right between the
two verts at the bottom
of the stem. Draw a line upwards to the top
of your leaf and click
right between the two verts at the top.
It
should look like this now.

We
need to do this a
few more times but this time in the other
direction. We want to
create edges that connect the verts on
the right with the verts
on the left.
For this you should
use the 3d snap tool. After you turn it on,
right click it to change
the snap settings. We want to snap to
vertices so place a
check in the vertex box and uncheck any other
settings under the snap
tab.
You should still be
in poly sub-object mode with the cut button
depressed. Cut lines
across your leaf object connecting the verts
on the right with the
verts on the left.
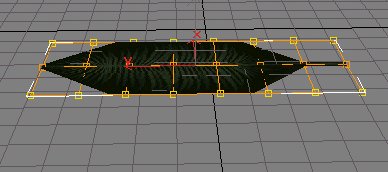
It
should look like this when you're done.
Don't
forget the one
at the top of the stem.
When you're done, exit
out of poly sub-object mode and save. You
can shut off 3d snap.
Now
would be a good time to go back and check your work.
Press "Q" in 3dsm
4 to see how many faces you have. 16?
If so, that's good.
Go into sub-object mode and click on
the vert button to
check the number of verts you have.
You should have 15. Sometimes
extra verts can be created
by accident when cutting
lines. I'm not sure what causes that
to happen but if that
has happened to you, you'll want to fix
it. One way to get
rid of extra verts is by selecting an out
of place vert and
one that is close by and then welding them.
Afterwards you can
move the vert into the correct position.
So
now we have a palm leaf object with 16 faces. It's a
nice
low number. Our
finished tree will have a low number of polys
and won't take up
a lot of resources.
We
can hide our reference plane now. We're done with it.
With your palm leaf
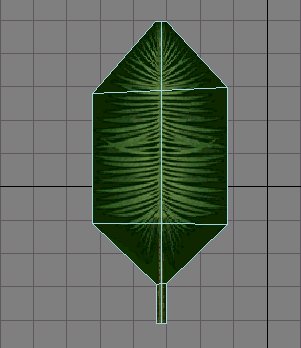
selected, apply the palm tree texture to it.
Next apply a UVW Map
modifier and then apply an Unwrap UVW.
Click on the edit
button in the parameters rollout. We need to resize
the outline of the
leaf so that it fits over our leaf in the texture.
Do this by using the
horizontal and vertical scale buttons to scale the size
down and use the move
tool to position it over the leaf texture.
And now the textured
palm leaf should look like this. Save.
Making
the leaf is the
hardest part. Once you
get the leaf made, the
rest is pretty easy.
I think we're ready
to start bending this baby.
Bending the baby
Apply
an edit mesh modifier to your leaf object.
Next apply an FFD
Box Modifier and change the number
of points by clicking
the "Set Number of Points" button.
Use Length: 8, Width:
3 and Height: 2.
You should change
views at this point. The perspective view
works best for me
but you should use whatever you feel
works best for you.
We want to view our leaf from the side.
So find a view that
works well, you may have to use arc rotate
in order to get a
good perspective from the side.
Initially you'll need
a slight angle looking down from the top.
In
the window to the
right where it shows the modifier stack,
click the little plus
sign to the left of the ffd modifier to expand
the view of the sub-objects
and select the control points sub-object mode.
Now select all 8 control
points on each side of the leaf.
They
turn yellow when
selected.
Pull downwards on the
Z axis using the move and select button.
You may need to adjust
your view from time to time to examine your work using arc
rotate.
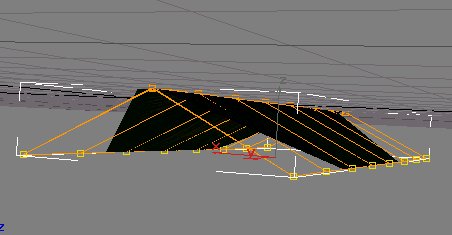
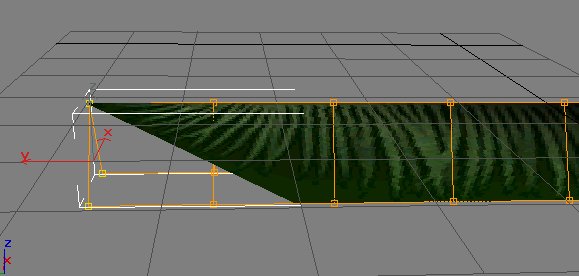
Something
like the above
picture is good.
Now we need to move
these selected control points towards the
middle. You can do this
one side at a time by deselecting 8 control points
on one side and moving
the selected control points towards the middle.
Then deselecting them
and selecting the other 8 control points and doing the same.
An easier way is to
keep all 8 control points on each side selected and clicking
the select and non-uniform
scale button. If your leaf is like mine, the X axis is
the
one that runs across
the width of the leaf. That's the axis you want to non-uniform
scale your control points
on. Dragging the cursor one way will spread them apart further
and moving the cursor
the other way brings them closer together.
Try to position them
at equal distances from the middle.
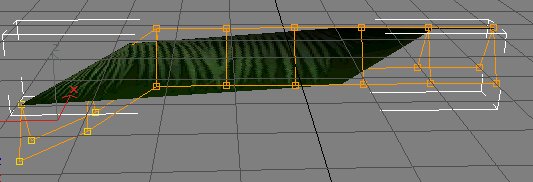
On
this next part, you're
going to have to use you're own judgment.
Select control points
in groups of 3 and pull downwards to give an arcing
shape or a bending shape
to your leaf.
In most cases you'll
want to select entire rows of control points.
For example, in the
picture below I've selected the 1st row of control points.
Sometimes
you'll want to select 3 or 4 rows
at a time. Take your time and make small
adjustments. If the
leaf pops out of shape, then simply undo the last move
and try
something
else.
What I like to do is
grab the 1st row and pull them down a bit, then grab
the 1st two rows
and pull them down some.
Then I'll jump over to the back where the stem is and
select the last
row and pull them down,
then I'll select the last 2 rows and pull them down
a little.
Then you might select
1 or 2 rows in the middle and move them upwards.

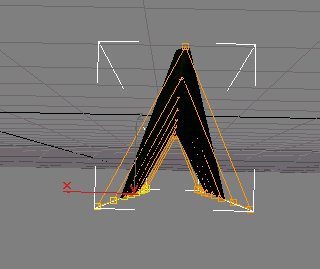
Now
this next picture shows that
I selected the middle 2 rows and pulled upwards on them
but the leaf didn't bend.
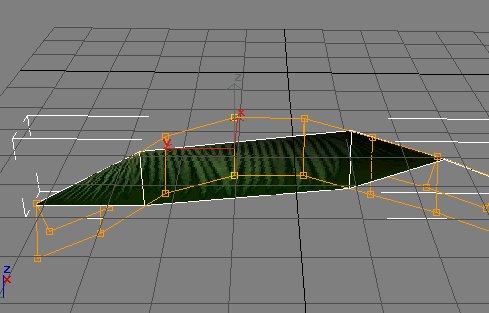
You
can also see in the above picture that there's no edges in
the middle
of the leaf. The leaf
will only bend where there are edges.
So, if you need to your
leaf to bend there, you'll need to go back to an
earlier version of your
leaf and add 2 more verts to each side of the leaf,
and then cut a line
across the leaf connecting the new verts. You'll also
be adding about 8 more
faces if I'm not mistaken.
Anyway, for now, this
leaf will work fine. We could've gotten by maybe
with just 5 control
points for the length.
Save.
The Trunk
Deselect
any control points that are still selected and exit out
of sub-object mode.
Apply an Edit Mesh
modifier.
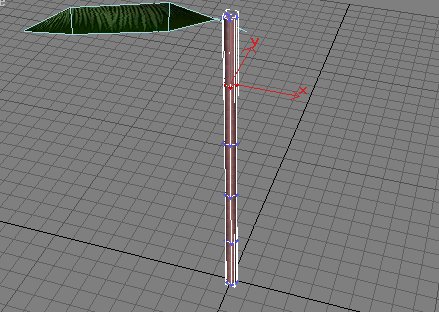
Time to make a trunk
for our palm tree.
Make a cylinder
and give it a name. I named mine Palm_trunk.
Click on the modifier
tab to change the number of sides to either 5 or 6.
Height segments can
be as many as you like but the more you use, the more
polys your tree will
have. I chose 5 segments for mine.
For the Height, I
chose 1.5m. I basically just look at the size of my leaf and try
to make a trunk that
looks proportionally right. In this case 1.5m for the height of
the tree seems to
look right for the leaf. You may want to make your's a little smaller
or a little bigger.
Same thing for the radius. The trunk on a palm tree seems to start out
a bit fat and then
gets skinny for most of the length of the tree but then widens out again
towards the top.
So I'll start with
making my radius a bit on the small size.
For my trunk, it looks
like a radius of anywhere from .02m to .03m will be fine.
I chose .025m.
If you know that you
want your trunk to be a certain height like for example you already
know you want your
trunk to be 3m high, then you can just make it that height and resize
your leaf so that
it looks to be proportionally right for your trunk. You can apply
an xform modifier
to the leaf and then scale it bigger.
Save.
Convert
your Trunk to an Editable Mesh.
This next part is
up to you. You don't have to do it if you don't want to.
I like to select the
verts and move them around a little. It's not that important.
By moving them around,
you can control the size of each height section.
It just gives your
tree a little different look when you go to make either the top or
bottom section a little
fatter.
I want my top and
bottom sections to be short and fat, not long and fat, so I make
those sections shorter
by moving the verts towards either the top or bottom.
To select a row of
verts, go into the sub-object mode of your editable mesh by
clicking the little
plus sign to the left of it and select vertex, or , in the selection rollout
just click the vertex
button.
Now select the row
of verts 2nd from the top.
Use
the select and move
button to move them higher on the Z axis.
Roughly halfway towards
the top is good.
Deselect the verts and
select the row of verts 2nd from the bottom and move them
halfway towards the bottom.

Again,
it's up to you
whether or not to move any other rows
of verts. I'm going
to move my middle 2 rows apart some.
An easy way to move
both at the same time is to select
both rows an then click
the select and non-uniform scale button.
This will allow you
to move them both in opposite directions
simultaneously.
Make sure you select
the Z plane so you can move them up and down.
Here I moved them apart a little.
Exit
out of sub-object
mode.
Save.
Now we can make the
tree a little fatter near the top and bottom.
Using Poly sub-object
mode this time, select the polys of the
bottom section of your
trunk and use the Select and Non-Uniform button
to scale the trunk fatter
on the XY axis.
You'll have to use your
own judgment on how fat to make the trunk.
Just do whatever looks
good to you.
Do the same to the top
section as well.
Here's
how mine came out.
I'm
not real happy with
those sections that are 2nd from
the top and bottom.
I'm going to re-adjust my 2 middle
rows of verts closer
to the top and bottom so that more of
my trunk in the middle is
skinny.
I
like this a little
better.
Thinking ahead though,
if I want to give my palm trunk
a bend in the middle,
I won't be able to do it because
I don't have a row of
verts in the middle.
Grrr... sometimes it
pays to do a little more planning in
the beginning.
But, there's a simple
solution to this problem.
Go into Poly sub-object
mode and select all the polys of the
middle section of the
trunk.
Click the Slice Plane
button under Edit Geometry.
See
that yellow plane? When you click the Slice button you'll be
slicing your polys
on that yellow plane.
You can kinda think of it as a big knife.
So here I clicked the
Slice button and eureka! My middle section has been divided
in half.
Exit
poly sub-object
mode.
Save.
There's a couple more
things to be done to this trunk. We need to texture it, and
we
need to bend it. Well,
we could just leave it straight, but, I like making them bend
a bit.
It will be a bit more
difficult to apply mapping coordinates after it's been bent
so let's
do the mapping and texturing
first.
This time we're going
to only texture part of the trunk with the trunk texture, and
the
small section at the
top will be textured using the coconut texture.
This might not be the
best way to do this or even the right way to do this, but for
me
it works ok.
The palms
in the stock maps have the coconut textures applied to what
looks like a separate
object near the top of the tree. I'm not sure if that's what
they
did or if they just
altered the trunk by scaling some polys larger near the top.
It's up to you how you
want to do it. You could even place some small spheres near
the top
with the coconut texture
making it look like real coconuts.
In order to texture
the tree with 2 different textures, we have to select the polys
we want to
apply a texture to and
then apply the texture followed by the UVW map modifier and
an Unwrap
UVW modifier.
So select your trunk,
go into poly sub-object mode and select all the polys except
for the
the polys in the top
most section of the trunk. Once they're selected, apply your
palm tree
texture to them and
then apply a UVW map. Use Cylindrical mapping.
Next apply an Unwrap
UVW. Click the edit button to adjust the UVWs.
Select all the UVWs
and use the horizontal scale button to scale them smaller. Use
the move
button to position them
over the trunk texture. Make sure all the uvw's are on the
trunk texture.
Should
look like this
Once
you have it, close
the window and apply an edit mesh
to the trunk.
Go back into poly sub-object
mode and select all the polys
of the top section of
the trunk. Don't forget the cap which is
the top face. Apply
your coconut texture to the selected polys.
Apply a UVW map modifier
and use Box mapping. It should look
fine without using an
unwrap Uvw. Now apply an edit mesh.
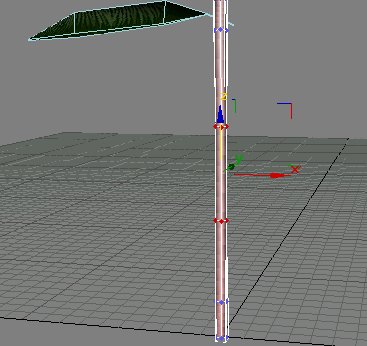
Apply a Bend modifier
and give it a bend by changing the amount of
the
angle.
I
used
-12 for the angle on mine.
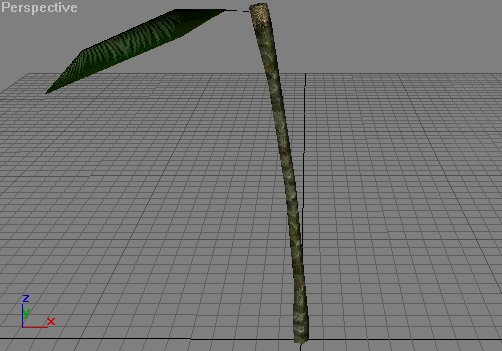
I
just stuck the palm
leaf up there to give some perspective.
Apply an edit mesh and
Save.
Leaves
This next part will
take some time to do. Using the leaf we have,
we'll clone it to make
lots of leaves and then arrange them around the top
of the trunk.
But, before we do that,
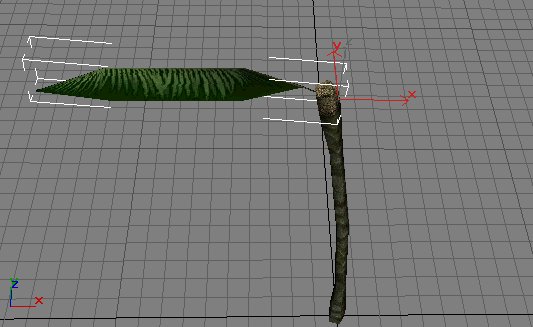
it might be easier if we move our leaf's gizmo/pivot point.
Select the palm leaf
and zoom in on it using zoom extents all.
Looking at it from
the side in your perspective
view might be a good angle.
Click on the Hierarchy
tab, make sure the pivot button is depressed and click the "Affect Pivot
Only" button. Click the select & move button. Adjust the gizmo
so that it's lined up
with the very tip of the stem. Use the arc rotate button to view
the leaf from different
angles to make sure you have it lined up as close as possible.
Once you feel you have
it, click the "Affect Pivot Only" button once again to turn
it off.
Now use the align tool/button
to align the pivot of your leaf with center of the trunk
on the xy axis and maximum
of the z axis. This is just meant to put you in the ball
park.
You may have to make
some manual adjustments to it to get it centered properly.
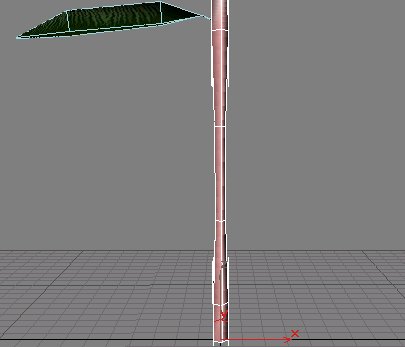
We want the end of the
leaf's stem to be in the center of the trunk and near the
top. Something like the picture
below is good.. it doesn't have to be perfect, you'll
be making
more
adjustments
as
you go.
What I do to make copies is press and hold the shift key while
rotating the leaf
a short distance on the z axis. Then I'll enter in a number like
5 or 6. I'll do
2 levels of leaves like this but with different angles. Then
a couple leaves pointing
upwards. Here's an example of how I start out.
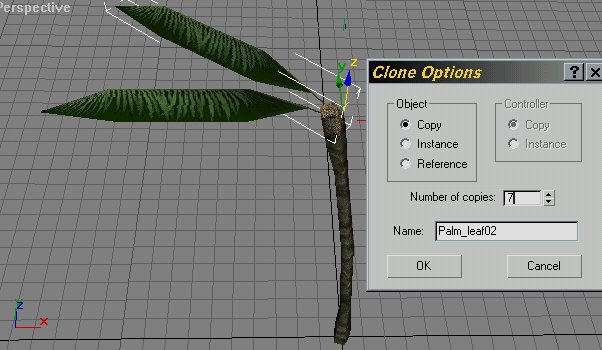
So here I entered 7 for the number of copies.
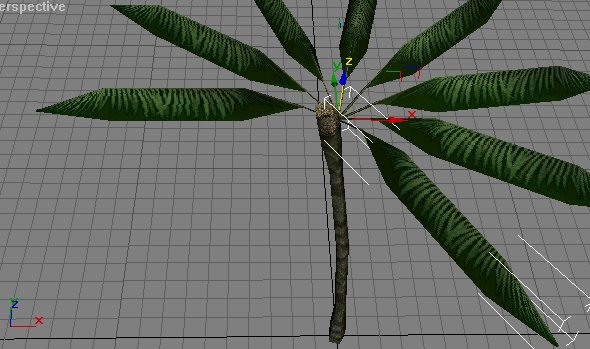
And here is what I got. As you can see, these leaves are
all going to need to be adjusted.
I'll space them out more and get the tips of the stems lined
up with the center of the
trunk. And the next picture shows my tree after adjusting
the leaves. I actually moved
the tips of the stems past the center of the trunk to shorten
the amount of stem that
shows. The reason I did this is because in game when there's
a long stem it tends to
make the tree look less full.
Ok, now we need to add another layer of leaves. An easy way
to do it
is to just select all the leaves and then hold down shift
and drag down
on the z axis a small distance. You can even rotate them
on the z axis
a bit afterwards. Doing that will fill in the holes between
leaves a bit.
Only thing is the new layer of leaves has the same angle.
I don't know
any way of changing the angles other than adjusting them
one by one.
It's tedious but worth it in the end I think.
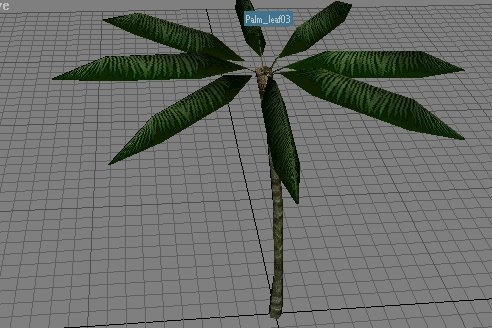
Here's my palm tree after spending some time adjusting the
angles of
the leaves. I also went back to the 1st level and made the
angles of the
leaves a bit more random.
Now it looks more like a palm tree but there's more we could
still do to make it look a little better. It still looks
a bit open,
not as full as I would like. I'm thinking a few more leaves
would help.
But we need some smaller leaves to give some variation.
Select a palm leaf and holding
down shift, rotate the leaf so
that it points upwards. Just make one copy for now.
Next control select the trunk so that your new leaf and trunk
are selected. Right click the viewport and choose hide
unselected.
This will give us a better view.
With just your new leaf selected, apply an xform modifier
and scale it smaller using the select and uniform
scale button.
You can unhide the rest of
your leaves now to compare the difference in size. Once your
happy with the new leaf's
size,
apply an edit mesh.
Save.
Hold down shift and rotate
your new leaf on the z axis to make
some copies. Let's just say 3 for now and see how it
looks. This will give us a total of 20 leaves. Now just
adjust
them
to
your liking. You might want to hide the other leaves.
It will
make things easier.
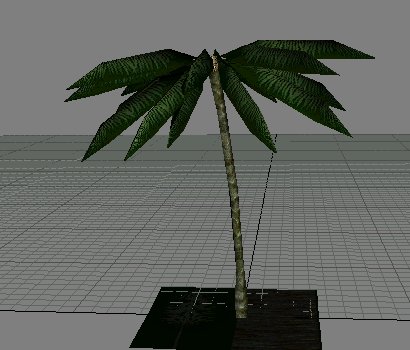
So now here's my finished palm tree.
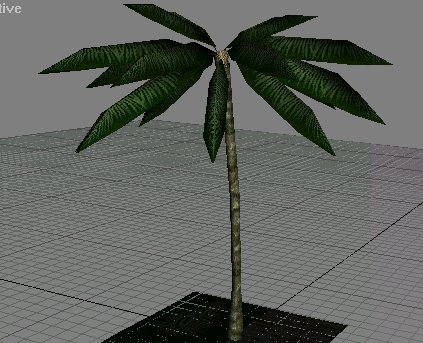
Again, you can add more leaves if you like. But if you
have
20 leaves like I do and they're 16 faces each. That's 320
faces.
My trunk is 80 faces. That gives me a total of 400 now.
See how fast they can add up?
We still need to do a collision
object. Might be better to just use a cylinder with 2 height
sections for the collision to save on polys but it's up
to you.
You should be able to do that on your own. You can go
back to the canopy tutorial for instructions on tagging and
adding
the O helper point and everything else related to preparing
it
for your map and exporting.
Hope you had fun. Now you
can
see why I saved the Palm tree for last.
Just a reminder, this palm tree is pretty small. I
think it's a few
feet tall. Just use xform to make it larger like in
the canopy tutorial.
Here's a screen shot from in game to show how it looks.
Keep in mind, this is after I've applied the xform modifier
and scaled
my tree larger.
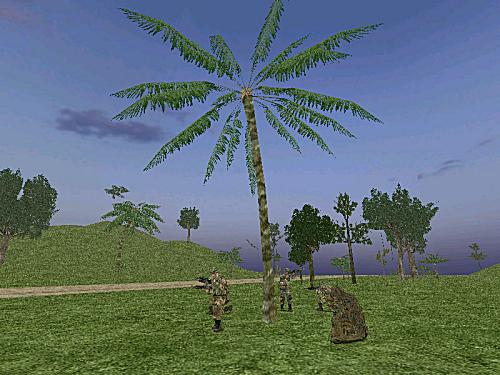
Not one of my best looking palm trees, the leaves are
too long and rigid looking. But the idea here was just
to show
my basic steps for creating
a palm tree. Once you have learned these steps and understand
how they affect the model, you can then make adjustments
to suit your own taste.
shiver
|


