|

How to create your own
skies in Ghost Recon
I decided that I wanted to be able to make
my own skies after looking at some pictures I took in France
of sunsets there this New Years. This is a very advanced tutorial,
and you will need a very good graphical skill and be somewhat
familiar with the Ghost Recon mod system.
Note: This tutorial is written for Paint
Shop Pro 7 – but if you can work out how to use Photoshop
6 then this will suffice.
What you will need
- A high-res picture of a sky [take a photo]
- Paint Shop Pro 7 or Photoshop 6 [Grab
PSP here]
- RSB export plug-ins [Grab them here]
- RSB Converter [Grab it here]
- SkyBox Editing Kit by Firestar [Grab
it here]
- This kit contains the Bitmap files used in this tutorial,
together with this complete webpage for reading and
working through off-line if preferable.
Get your pictures ready
Decide which map you are making a sky for.
For example, we will choose m07 – River. Browse to <ghost
recon folder>\Mods\Origmiss\Textures\ and locate the following
files:
- m07_river_LF.RSB : Left side of
skybox texture (west)
- m07_river_FW.RSB : Forward of skybox
texture (north)
- m07_river_RT.RSB : Right side of skybox
texture (east)
- m07_river_BK.RSB : Back side of skybox
texture (south)
- m07_river_UP.RSB : Looking directly up
These files are quite obvious and easy to
find, arrange the folder by filename and you are set.
Copy these files to a temporary folder that
you have easy access to, i.e. something like “Sky”
on the desktop.
Now use Mike Schell’s RSB converter
to convert them en mass to Rogue Spear format RSBs –
the format that the RSB plug-ins were written to handle.
Making a seamless sky
Open up your sky picture in your graphics
editor – I am using PSP7 because that’s what I know
how to use best, and I believe has the best tools for the
upcoming job.
Cut a 1024x256 pixel chunk out of the sky
of your photo – if you do not have such a large chunk
then you should use the clone brush to fake areas of the photograph
– practice in this case DOES make perfect and you will
need the clone brush a lot in this tutorial so get used to
it now.

 The image in PSP
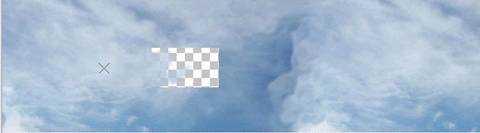
Using the clone brush to fake the sky
Once you have a solid 1024x256 chunk of
sky, make a new image in PSP 2048x256.
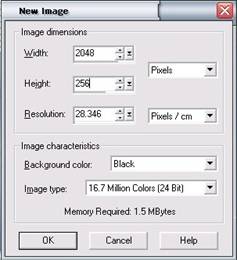
The New Image dialogue box – dunno why the hell it is
pink.
This is double as wide as your last one.
Copy the chunk of sky from your previous picture using Ctrl+C
and then paste onto the new canvas once so it is aligned left
using Ctrl+E and then pasting again so that the right hand
edge of the first picture aligns with the left hand side of
the floating image that you just pasted.

The first half of the image pasted into the very large canvas

The image pasted twice – with an obvious join line in
the middle.

The final join – seamless.
Now you are going to mould the two pictures so that the transition
between far right edge and left edge is seamless. This is
to be done with the clone brush but only so that you are modifying
the left hand side of the image that you pasted secondly,
cloning from the right hand side of the first image. This
process is very difficult to write down, so follow the pictures.
When the connection looks good, copy your
new image back into a 1024x256 canvas and SAVE.

The final product – make sure the dimensions are correct.
Splitting up the files into each side
Load up “Skybox Lineup.bmp” from
the Skybox Editing Kit into your graphics program. Now load
your saved sky – although it will probably already be
open. Hit Ctrl+C to copy it and then move to Skybox Lineup.
Hit Ctrl+L to paste it as a new layer. Now go Layers ->
Properties and change opacity to 50%. Hit OK and now you can
see through the image to the backing which is split into 4
segments, left, centre, right, and back.

Layers menu

Layer properties box

Seeing the clouds mixed with the template.
At this stage, load the 5 RSB files that
you converted earlier into PSP.
On the lined up skybox, bring up the selection
tool, making sure that in the tool options palette Antialiasing
is NOT enabled.

Antialiasing disabled
Now drag along the outline of each square
until you have selected 1 square. Copy this square and paste
it into the corresponding RSB file, above the existing image
in that file and resaving it.

Soon you should be left with 4 RSB files
with images like this in them:

The first four skies together
You should also save these files as PSP
files for future editing, mine were called (cunningly) left.psp,
centre.psp, right.psp and back.psp. You will need these to
create the UP image.
Creating the UP image
Open “Skybox Template.bmp” from
the Skybox Editing Kit into your graphics program. Now load
in each of your 4 images, rotating them as appropriate (press
Ctrl+R to bring up Rotation menu) so that the top of each
image points inwards towards the green box labelled“UP”.

Create a new 256x256 pixel image –
black backgrounds work best. Arrange the two windows so that
they are tiled and one can be drawn upon while the other is
in sight.

Now, clone from the template to the new blank file a chunk
of sky that blends all the sides to a central point. This
is the up image, and when complete can be saved as m07_river_UP.rsb.
Putting them in to the game
Now that you have got all your images, the
problem is getting them into Ghost Recon. Create a new folder
in <ghost recon folder>\Mods\ with a subfolder called
Textures. Into this put in your new RSB files, and then enable
it from GR (don’t forget to create a ModsCont.txt file
in your mod folder). You will have to restart GR before changes
will take effect. Play the map and see your beautiful photos
in action.
GAK_Firestar~*
Thanks to SPRAY from GhostRecon.net for
proof reading this tutorial from the eyes of a graphics genius!
Thanks to Daywanderer from GhostRecon.net for proof reading
this tutorial from the eyes of a skilled writer!
© 2002 Charles Amick
http://matrix.ghostrecon.net
|
