| Introduction
Special thanks to Javaman who made
my map making skill possible up to this point. Also
to Mike Schell for his tools he made available! Experience
level: BASIC or beginner.
Tools needed
- 3D Studio max 4,4.2 or 5 (and an
understanding of the user interface)
- Photoshop 5 or higher
- Mike Schell's example
map because we can simply "merge" his
scenecenter into our map...no need to re-invent the
wheel right?
- Red Storm Entertainment's pdf
tutorial...read it before you continue!
Some resources for help and teaching;
You must be willing to research and
learn to make maps for Ghost Recon, if not why bother?
there's alot more to know than what I'm going to show
you, but this tutorial is meant to get your feet off
the ground. A place to start.
You may email me at chris_jennifer@nexgo.de
or contact me at www.sealzeurope.com
map making forum with questions or help. My knowledge
isn't wholly complete, but I'm getting there. I want
to share with the GR community what I can, and help
others who, like me have been looking for help on making
maps. Good luck and hope to play on YOUR maps soon!
After a time I've realized that the
stock GR maps have become mundane and we need new maps
for new missions. So, I managed to get in contact with
Javaman of theplatoon
and he was very kind and helpful in teaching me the
basic map making skills that I have. This map is simple,
don't expect too much all at once, time and persistence
will give you rewards in the future. Keep up your work
and don't be discouraged!
Getting Started
I'm assuming that you have put your
plugins into their correct folders accordingly! 3D Studio
max has a STEEP learning curve so I won't get into specifics
but will show you what tools you use to make a simple
basic map - one that can be exported and played in GR.
So with 3DS Max open, go to this
tool bar and notice the six tabs total. And you'll see
here that we are at the "CREATE" tab where
we need to be or should be. Now you see here that it
is set for "Standard Primitives", and the
little down arrow to the right of the standard primitives
text is a drop down menu...click it and select
"PATCH GRIDS"

So that when you're
done selecting the patch grids choice, you'll
see this.
You need to click the
"Quad Patch" button and then you should see
what is shown here above. The Keyboard Entry may be
closed with a "+" on it's left, click it to
open the properties like I have here. Notice I haven't
filled in the X,Y&Z, we are ONLY worried about the
Length and Width here. Do the same below for the Parameters
and fill in the Length Segs and Width Segs to 10 and
click the "Generate Mapping Coords" and click
on the "create button that will create a quad patch
400meters by 400 meters. when you have done this correctly,
You should see your quad patch in your "perspective"
window like below.

The patch grid here
will be our map for the game. This is what the players
will walk on when playing your map, the "terrain"
to be more simple.
Texture
Next, let's put a ground
texture on our map okay? Go to your Render menu at the
top and select the feature "Material
editor" , which brings up this box ...

Select one of the balls
at the top, click the square button to the right of
"Diffuse" and you should see a texture select
dialog box like you see when opening a file and select
your texture. We want to select a texture that has very
little or no pattern to prevent a funny look on our
map. So let's use the texture on the Desert Siege map
map 08 called SP08_Ground_Detail.rsb. Since in order
to export properly, our textures MUST be in .RSB format.
So we want to paint the texture on to our map. To do
so, under the balls, is a set of buttons. To put the
texture on the map click the button that looks like
a checkered box and then the button like this below
"Assign
Material to Selection";
The output in your perspective
window then should include the texture. Now your map
is getting some look to it. But the map doesn't look
right still but that's the next thing we'll do. We'll
arrange the texture to look better on our map.

The texture looks terrible
on the map but we're going to fix that now. Go back
to the "Modifier" tab on our tool bar on the
right, it looks like the bent rainbow(second on the
left) and click it and click the down arrow again and
go to UV Coordinate modifier and select "UVW Map"
This tool will tighten your texture to your map and
generally overall give it a better appearance. Generally
setting your UV settings from 20 to 100 will yield the
best results. NOTE: ONLY
use the UV...Not the W setting.

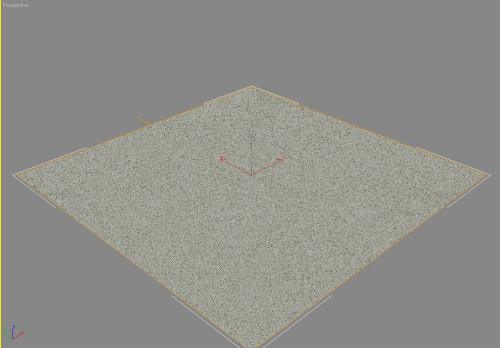
Now you'll have
a textured map. For this map set the mapping to "planar"
I'll set the U tile and the V tile to 100. You can use
what you want. NOTE: leave the W tile alone...you do
not need it for this tutorial or at all. When you are
done your map should now look like this.
You should notice
the texture has been tightened up. The texture will
look more real now within GR. I've noticed alot of mappers
who don't use the UVW map feature to improve the look
of the map. Your map will show the time you put into
it... so do it right the first time!
Scenecenter
Now that we have
basically made the map, and I've covered what I planned
to in this segment of map making, We need to finish
up by adding a "scenecenter" to the map for
IGOR and the Game engine. Without your scenecenter,
You will do nothing but crash IGOR and have nothing
working for GR. Download Mike Schells example
map and get ready to merge the scenecenter to our
map.
Merging a SCENECENTER
into our map is quite easy. You just have to look through
a menu of objects in the example maps list of objects
and select it then it will be placed in our map and
out of our way. NOTE: You won't see the scenecenter
on your map because as all good map makers know, you
should hide it so you don't move it. Mike put the scenecenter
in the right place don't worry. All we have left to
do is group our map together and export it. To merge
the scenecenter from Mikes
Tutorial, click merge under the file menu like
this.
You should then
see a Dialog box like
this at which time we see scenecenter contained
in Mike's example map. Select it and click OK. Now the
needed scenecenter is in our map for use. We are almost
ready for exporting our map, but still not yet.
Tagging our
floor polygon
Tagging our floor
polygon is most important as it tells GR what the players
will be walking on in the map. To tag our map, you should
be sure that the map is selected in the perspective
window and then go to the tab to the right of modifiers
with the picture of the hammer "utilities"
on it like below
And when you
select the Utilties tab you'll see your map editor in
the list of buttons like here below; (if you setup your
plugins according to Mike Schell's tutorial
on map making.)

Select your map
and be sure it is selected by seeing if your map is
outlined with white lines. Press the map editor button
and you'll see a dialog box open to the tab polygons
like this.
Set your surface
property to Baked Clay since the texture is really baked
clay and put a check in the "floor polygon"
box and hit OK. There! You've tagged your map floor
for play in GR and we can now group our map for export.
Grouping our
map
Grouping our
map is important, in grouping things on the map to their
respective rooms. To group this simple map, just select
your map like you did for the map editor and then go
to the group menu and select "group" which
should be the only available option here. Another dialog
box will open that looks like this.
Once you select
"Group" from the menu, you'll see the below
dialog box open and put "_1" (without the
quotes) into the dialog box like
this.
What we have
just done is grouped our new map and designated it at
an outside room with the _1. All rooms with 1 as the
first digit such as _1, _10 _ 101 will be known as outside
rooms in GR.NOTE: due to a game coding problem, DO NOT
name any room group as _100 as it will cause a problem
in your game. Click OK.
Now we can export our map to play it in Ghost Recon!
Exporting the Map
To export our
map, go to the file menu and select the "export"
option.
And you will
then be presented with this dialog box. Again if you've
placed all of the plugins into the 3ds max folders properly,
you should see an export file option that has ".MAP"
for an option. this is the file export option you will
need to export future maps. So once you've selected
export you'll see this
dialog box.
Give your map
a name. NOTE: save this map for the next tutorial where
I'll show you how to give your map hills and valleys
in a .MAX file format!
Once you've given
your map a name and clicked Save, you should see the
final dialog box like
this.
Check and make
sure everything in your export options is set according
to what see you here in the above picture. Export units
should be set to "meters", check weld vertices
and clean vertices attributes. the export coordinate
system should be 3D Studio max and so forth...click
ok, you've done it!
You've made
your first Ghost Recon map...Congratulations!
Before you export
your map, be sure you have a roomlist.txt file in your
folder where you export your map into. Since this map
is one room and no shermanlevelheights are necessary
as IGOR will work fine without it. Make sure your maps
texture is in .rsb format and also in your mods map
folder with your map. Setup an environment in your IGOR
and have fun!
=SeALZ=Papa6
|


