|
Location
|
Operatives
|
Objectives |
|
South Ossetian Autonomous Region
April 24, 2008 - 02:15
Cloudy
|
|
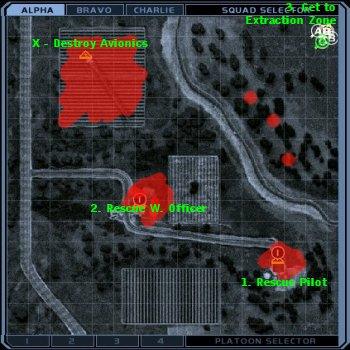
1. Rescue Pilot
2. Rescue W. Officer
3. Get to Extraction Zone
X - Destroy Avionics
|
Hopefully you completed
the bonus objective on M01 and acquired Will Jacobs and his
OICW. Now it's time to put this new hi-tech toy of an assault
rifle to use.
This is a night mission,
so nightvision goggles should be activated at all times. You'll
get some nasty tunnelvision, but the NVGs will also make the
Ts light up bright green like a bunch of radioactive lollipops.
I put Jacobs on Alpha together
with a Demo operative, Bravo is ready to rock with two Riflemen
and one Support, and Charlie stays exactly the same as on
M01, with a sole sniper.
You're inserted in the
northeast corner of the map with objectives to your west,
southwest and south. Start by spreading the squads out - send
Charlie due south towards the woods there, while Bravo should
enter the woods with a cource for Objective 2. Beware in the
woods, there are at least two two-man patrols in your general
area. Move in as Alpha and use Bravo as support, they shouldn't
be very difficult to get rid of.
Next, send Bravo across
the river and towards the field east of Objective 2, while
you move towards Objective X. Go north until you hit the border
of the map, then continue on west. You should be able to take
out several from across the river. Once it looks clear, move
in and mop it up. Keep an eye on the threat indicator and
move slowly towards the plane. After it's cleared up, plant
the demo charge, give Alpha a waypoint close to the road north
of Objective 2, and switch to Bravo.
Move carefully over the
field and towards the house, there are a few Ts strolling
around there. When the outside looks clear, go in, but watch
out for the east window - there tends to be a bad guy in there
waiting to take a shot at you. There is usually also one in
the living room, and one or two upstairs. The fighter's weapons
officer is also being held upstairs, so watch your fire. Semi-automatic
firing is recommended. When the weapons officer is safe (for
now), send Alpha a little bit down the road, towards Objective
1 and switch to Charlie.
Sniper time. Leg it across
the river and hug the east border of the map. Try to get in
position just east of the barn. Take down the tango strolling
around on south side first, then bag whoever's walking around
the front. Be patient, as some might come to investigate.
When it seems clear, switch to Alpha.
Proceed towards the barn
from the west. There's probably five to seven Ts inside, one
or two on each side of the door (sometimes one interrogating
the pilot), one upstairs just on the far side of the entrance,
and sometimes one covering the window above the entrance.
Again, keeping the guns on semi-automatic is recommended.
Go in slowly and clear it out.
Now to get back to the
EZ. The only tangos that should be left at this time is one
three-man patrol on the other side of the river. You can follow
the threat indicator and wipe them out, or you can just sneak
around them and go to the EZ. Either way, it's mission complete.
Specialist
Unlocked : Henry Ramirez (Rifleman)

|

